How to Mount Your New Art
Introduction:
Adding art to your home or office can bring life and personality to your space. Properly mounting framed art ensures its stability and security on the wall, allowing you to showcase your favorite pieces with confidence. In this guide, we'll walk you through the process of mounting D-rings and hanging wire on the back of framed art, as well as how to hang it securely on your wall.
Materials Needed:
- Framed artwork from FrameToWall
- Two D-rings (Included with Your Purchase)
- Picture hanging wire (Included with Your Purchase)
- Picture hanging hooks or nails (Included with Your Purchase)
- Measuring tape
- Pencil
- Screwdriver or drill
- Level
- Wall anchors (if necessary)
Step 1: Preparation
Before you start mounting the D-rings and hanging wire, choose the ideal location to hang your artwork. Consider factors such as wall space, lighting, and the desired height at which you want the art to be displayed.
Step 2: Determine Placement
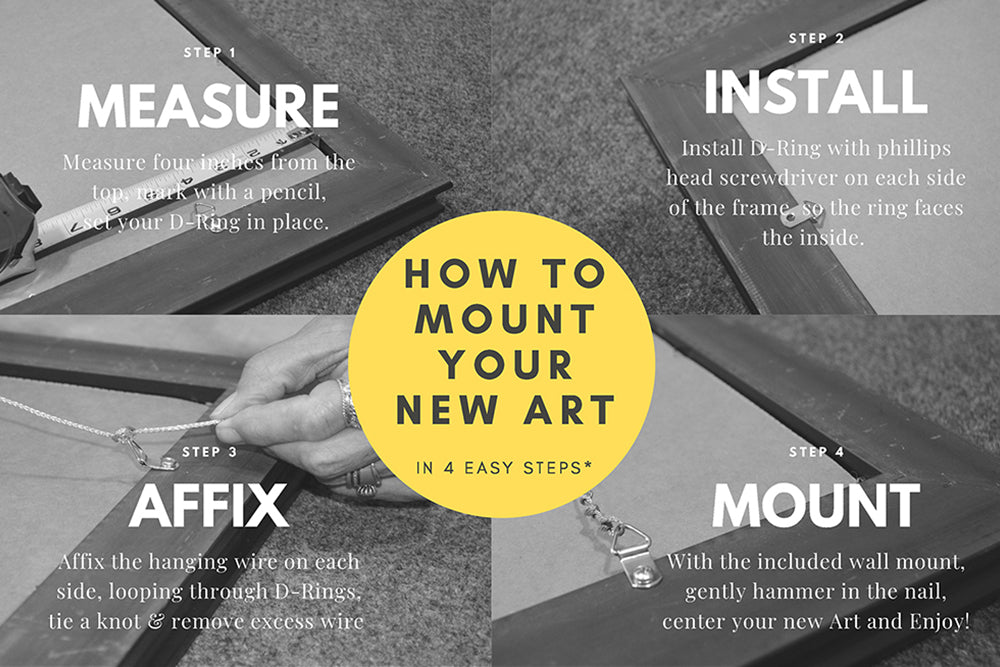
Turn your framed art over and measure the distance between the top of the frame and the point where you want the wire to hang. Mark this point on both sides of the frame with a pencil.
Step 3: Attach D-rings
Place the D-rings on each side of the frame, aligning them with the pencil marks you made. Ensure they are positioned horizontally and evenly. Using a screwdriver or drill, attach the D-rings securely to the frame with the provided screws. Make sure the D-rings are tightly fastened to prevent the artwork from slipping.
Step 4: Install Hanging Wire
Cut a length of picture hanging wire slightly longer than the width of your framed art. Thread one end of the wire through one D-ring, making sure to leave a small amount of slack. Twist the wire around itself a few times to secure it in place. Repeat this process with the other end of the wire and the remaining D-ring.
Step 5: Test the Strength
Gently pull the wire to ensure it's securely attached to both D-rings. The wire should be taut but not overly tight. Adjust the length and tension as necessary by twisting the wire around itself. Trim any excess wire if needed.
Step 6: Mark the Wall
Hold your framed art against the wall at the desired height and center it according to your preference. With a pencil, mark the top center of the frame on the wall. This mark will serve as a guide for hanging the artwork.
Step 7: Attach Wall Hooks or Nails
Based on the weight of your artwork, choose appropriate picture hanging hooks or nails. Position the hooks or nails on the wall, aligning them with the pencil mark you made. Ensure they are level and evenly spaced.
Step 8: Hang the Artwork
With the help of a friend, hold the framed art against the wall and align the D-rings with the hooks or nails. Carefully lower the artwork onto the hooks or nails, making sure it hangs securely. Step back and use a level to confirm that the artwork is straight.
Step 9: Finishing Touches
Once your artwork is securely hung, adjust its position if needed. If the artwork tends to tilt forward, use adhesive rubber bumpers or felt pads placed at the bottom corners of the frame to create a slight angle, ensuring it hangs straight.
Conclusion:
By following these step-by-step instructions, you can confidently mount framed art in your home or office. Remember to choose appropriate hardware, ensure the artwork is level, and take the necessary precautions to protect both the artwork and your walls. Enjoy the process of curating your space with beautiful, thoughtfully displayed art that brings joy and inspiration to your environment.


